Malaysian National Day Costumes for the Toddlers
- Sew, Jahit

- Jul 12, 2019
- 6 min read
Updated: Jan 16, 2024
A display of Malaysian patriotism with style, comfort and a lot of "awwws".

A BRIEF HISTORY
The history of Malaysia’s national independence is a little bit different (and a little bit dramatic). The official National Day, or more affectionately known as Merdeka Day, falls on 31 August every year. Like in most previously colonised countries, it is a commemoration of the country’s independence. But here’s the thing – only one half of Malaysia (the Malay Peninsula) achieved independence on 31 August 1957, and the country “Malaysia” did not even exist then. The other half, which consists of the states Sabah and Sarawak on the island of Borneo, was still under the British colonial rule. Sabah and Sarawak only achieved independence on 31 August 1963 and 22 July 1963 respectively. On 16 September 1963, they merged with the Malay Peninsula and Singapore to form the country Malaysia.
"But wait – aren’t Malaysia and Singapore two different countries?"
Yes, they are. On 9 August 1965, due to irreconcilable differences, Singapore separated from Malaysia to become an independent country, and Singaporeans have since been celebrating their National Day every 9 August.
Here is an illustration:
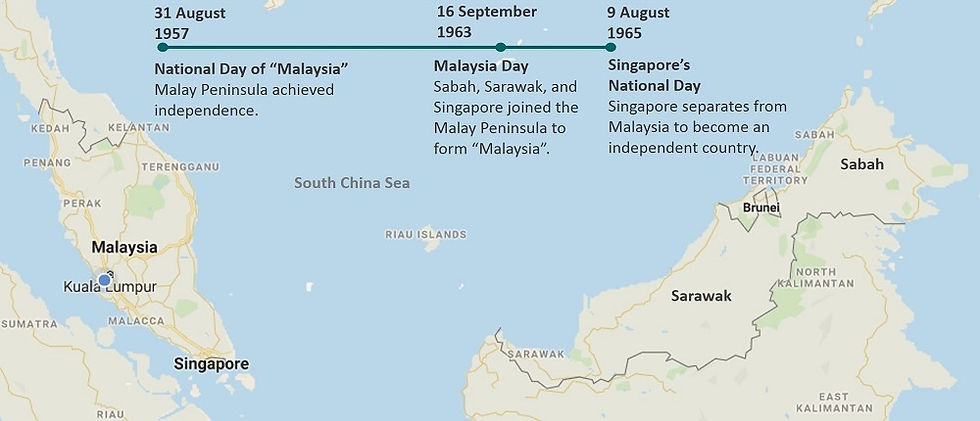
A very brief historical timeline of Malaysia's national independence.
So, strictly speaking, Malaysia has TWO National Days – the Merdeka Day on 31 August, which bears more significance to the Malay Peninsula, and the Malaysia Day on 16 September, which bears more significance to Sabah and Sarawak. As a result, the Malaysian National Day festivities usually begin every year with the month of August and end after 16 September.
NATIONAL DAY COSTUMES
It was an exceptionally meaningful Merdeka Day and Malaysia Day for us last year. So, I wanted to make a pair of national day costumes for my son and niece, whose ages are 4 months apart. As with any national day costume, there is usually a theme that revolves around the colours of the national flag. And here is Malaysia’s national flag:

The "Jalur Gemilang", the national flag of Malaysia. Source: Wikipedia.
Initially, I had a few design ideas in mind. Then, I found a store that sold these ready-made red and white striped T-shirts that were perfect for the theme, which meant half my work was done!

The T-shirt originally came with chest patches, which I have removed. Not exactly made with quality, but the material was soft and comfortable, and the colours and scale of the stripes were on-point.
All I needed to do then was to sew the bottom pieces of the costumes. The idea was to combine one T-shirt with a pair of shorts to make a romper for my son, and another T-shirt with a skirt to make a dress for my niece.
For the shorts, I used the free pattern from Sunny Day’s Shorts by Oliver+S. As for the skirt, I simply made a circle skirt. For both the shorts and the circle skirt, I used this plain cotton in royal blue. I made sure the waist measurements matched the width of the T-shirts, and I stopped short of inserting elastics into the waistbands as I will be attaching them to the T-shirts to create one-piece costumes.
To create the crescent and star, I first looked online for an accurate image of Jalur Gemilang, and cropped out the portion containing the crescent and star. Then, I adjusted the image size such that the crescent and star fit nicely on the shorts and skirt where I intended. Then, I printed out the image and traced the shapes onto plain yellow cotton fabric, and (very carefully) cut them out. After that, I appliqued the shapes onto the shorts and skirt.


True shapes of (and to-scale) cresent and fourteen-pointed star appliqued onto the shorts using a combination of straight stitch on the edges and zig-zag stitches to hold down point ends. Similar appliques were done one the circle skirt.
Now, before attaching the T-shirts to the bottom pieces, each T-shirt required some treatment first. For my son's T-shirt, I created a partial button placket at the back according to the tutorial from Make It & Love It, so that he could slip into the final romper. I also added a bow-tie on the front just to add a little bit of interest. As for my niece’s dress, it didn’t need any button plackets because she could simply slip into the dress. Just for aesthetics, though, I also added similar bow-ties on the shoulders.


Left: Partial button placket (with KAM snaps) on the back of romper, and the unfinished bow-ties on the shoulders of the (also unfinished) dress.
Right: Bow-tie on the front of the romper.
Then, I sewed the T-shirts to the shorts and skirt using straight stitch, making sure the resulting lengths of the romper and dress were appropriate to my son’s and niece’s heights respectively (by shifting the bottom pieces up or down the T-shirts). Now, I wanted these costumes to be worn for more than one season, and while I reckoned the widths would have no problem fitting the toddlers for another year, I was not so sure about the lengths. In anticipation of having to lengthen the romper/dress the following year, I used the longest stitch length on my sewing machine when sewing the T-shirts to the shorts and skirt, so that when next year comes, it will be easier for me to rip the stitches in order to lower the shorts/skirt.

The finished romper and dress.
And here are my son and niece in their National Day costumes (photos are from 2018). ♡ ♡ ♡


A YEAR ON
Almost a year later now, true enough, I have to lengthen my son’s romper by about 7 cm. My niece’s dress does not seem to need any alteration because she could simply wear them now as a shorter dress (it was rather long last year).
The lengthening process was straight-forward. First, I ripped the seam that joined the T-shirt and the shorts. Then, I shifted the shorts down 7 cm and sewed the T-shirt and shorts back together.


The front and back of the romper, one year on, before alteration.


A closer look at the inside of the romper, pre-alteration. Notice the ample seam allowance on the T-shirt below the stitch line that joined it to the shorts. This was the allowance I used to lengthen the romper.

Seam ripped. I steam-ironed the T-shirt where the previous seam was, to smooth out bumps and wrinkles and reduce left-behind stitch holes.


I shifted the shorts down the T-shirt's length by 7 cm and sewed them back together into a longer version of the original romper.
My son is now ready for National Day 2019!
EDIT: Here are photos of my son wearing the altered costume this year!


Venue: Dataran Putra, Putrajaya. Circa August 2019.
More info on the artwork signage: Autistic teen paints spirit of Merdeka on Putrajaya signage
WHAT OTHERS HAVE MADE
I have seen many children wearing costumes made using actual flags. Like these:


National Day costumes made using real Malaysia flags. Click image for source.
The skills and diligence put into making these intricate outfits are absolutely admirable. It certainly is not easy designing a costume within the confinement of the graphics of an actual flag, which is one of the reasons why I tend to avoid using actual flags.
Interesting Fact: While Malaysia does not have specific legislation regarding flag desecration, legal action can be taken against those who show disrespect towards the national flag Jalur Gemilang (Sources: The Star, Aug 2017 and The Star, Nov 2017). However, tailors continue to sew costumes using real Malaysia flags during the National Day festive seasons without problems with the law, though many are increasingly aware of the sensitivities (Source: New Straits Time, Aug 2018).
Legal or not, cutting the national flag feels a little bit unnerving (and wasteful) to me. So, for now, I'd stick to using regular fabric materials, which also allow me to choose more comfortable materials.
NEXT YEAR'S COSTUMES
As I have almost maxed out the length of the T-shirt of my son's romper, I expect next year I will have to either convert it into a two-piece set, or sew an entirely new costume. In fact, shortly after I made the costumes last year, I found these red and white striped fabric, which I added into my stash to standby for future!

100% woven cotton fabric in red and white stripes.
Found in Sewing World, One City, Subang Jaya.
My niece, on the other hand, could probably hang on to her dress for another year, since her dress still had plenty of extra T-shirt length. That is, unless she outgrows the width of the dress.
Let's see how it is next year!


Comments