Peranakan Tiles Inspired Quilt No. 3
- Sew, Jahit

- Apr 9, 2022
- 3 min read
Updated: Jan 16, 2024
Another project that turns the floor tiles design of the Peranakan style into a warm squishy quilt. Includes free foundation paper piecing and applique templates!
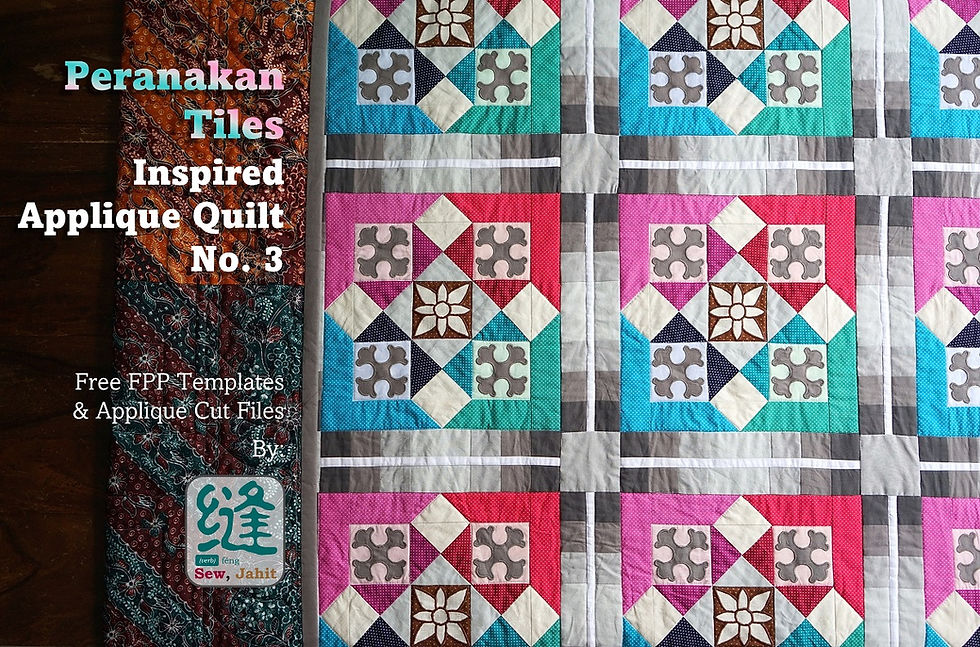
By now, my readers would know that I love the aesthetics of the Peranakan culture. After completing my Peranakan Tiles Quilt No. 1 and Peranakan Tiles Quilt No. 2, it was only a matter of time before inspiration kicks in again for this third take, this time based off these floor tiles at the front patio and outdoor corridors of the Cheong Fatt Tze Mansion (a.k.a. Blue Mansion), Penang, Malaysia.


Materials
For the quilt top, I used a mixture of various types of cotton fabrics that include quilting-grade cotton, Japanese cotton and cotton twill. For the backing, I used the machine-printed batik fabrics I purchased during my trip to Semarang, Indonesia. As for the backing, I used cotton-poly blend.
For the foundation papers, I used regular printer papers.
Dimensions
The quilt finishes at 161 cm x 196 cm.

Components
The quilt (minus the border) is made up of the following components (all dimensions shown are finished dimensions):
The Main Block
Quantity: 20

The Sashing Block
Quantity: 31

Corner Stones
Quantity: 12

Templates and Cut Files
Compared to the last two Peranakan tiles inspired quilts that I made, this one has a lot less applique and more piecing - foundation paper piecing, to be precise. Only the organic floral shapes at the center and the four corners are appliques (I did mine raw-edge).

To download the foundation paper piecing template and applique cut files (for raw-edge applique), click the following:
Note! The SVG cut files are already pre-sized to fit the measurements of the foundation paper piecing template. If you want to do folded edge or needle-turn applique, you can simply add offset to the shapes either by hand drawing or using image editing software.
Block Construction
Note! This is not a tutorial on foundation paper piecing. To learn the basics of foundation paper piecing, I strongly recommend watching a video tutorial like this one by Professor Pincushion.

First, use the downloaded templates to prepare all the FPP components as laid out in the image below. Then, follow the subsequent steps to construct the main block.

STEP 1:

STEP 2:

STEP 3:

STEP 4:

STEP 5:
Remove the foundation papers behind the squares outlined in red below. This is so papers would not be sewn with the applique stitches in the next two steps.

STEP 6:
Apply the centre flower applique and use satin stitch to embroider the outlines. Use thread of the same colour as the background (in my case, it was brown).

STEP 7:
Apply the corner flower appliques. The block is now complete. Repeat to make 20 blocks.

Sashing Construction
Start by sewing strips of 3.5 cm + (2 x SA) into strip sets and slicing them as follows:

Then, sew every two slices to a thin strip with width 1 cm + (2 x SA), to make 31 sashing blocks:

Quilt Top Construction
To assemble the whole quilt top, simply sew all the 20 main blocks, 31 sashing blocks, and 12 corner stones squares together as follows:
STEP 1: Sew rows of main blocks and sashing.

STEP 2: Sew rows of sashing and corner stones.

STEP 3: Sew all rows together.

STEP 4: Add border and the quilt top is complete.

Remove Foundation Papers
Here comes the bane of foundation paper piecing - removing the foundation papers. I find the tools that really helped were tweezers, seam ripper, and an awl.

This is a lengthy process. So get comfortable and turn on your favourite show.
Personally though, I find removing foundation paper piecing quite therapeutic. There's something about the sound and sensation of paper ripping along the perforation and coming off in one piece.
Basting and Quilting
As usual, I basted my quilt sandwich using large hand stitches, with the pool-noodle method. Then, I quilted the centre panel of this quilt by stitching-in-the-ditch using a ruler. Along the border, I quilted this heart-shaped pattern also using ruler work.

Final Steps
Once quilting is complete, I removed my basting stitches and bound the quilt using one of the grey tone fabrics used in the centre panel. Then, the quilt was finally complete!


Comments