How to Add Invisible Zippered Pocket to a Bag Pattern
- Sew, Jahit

- May 14, 2019
- 4 min read
Updated: Apr 2, 2025
Invisible zippers aren't just for garments. Sometimes, you want a bag that looks clean (no pockets, no zippers, no buckles), or you want to preserve the beauty of the bag's fabric print without interrupting it with unsightly zippers, but you also want the functionality of an exterior zippered pocket. If invisible zippers can serve this purpose in garments, it can certainly do the same for bags.

Note: This post illustrates how to add an invisible zippered pocket to the “DIY Basket Tote” pattern by Sew Can She. However, as long as you can grasp the concept behind this modification, it can be easily suited to any bag pattern.
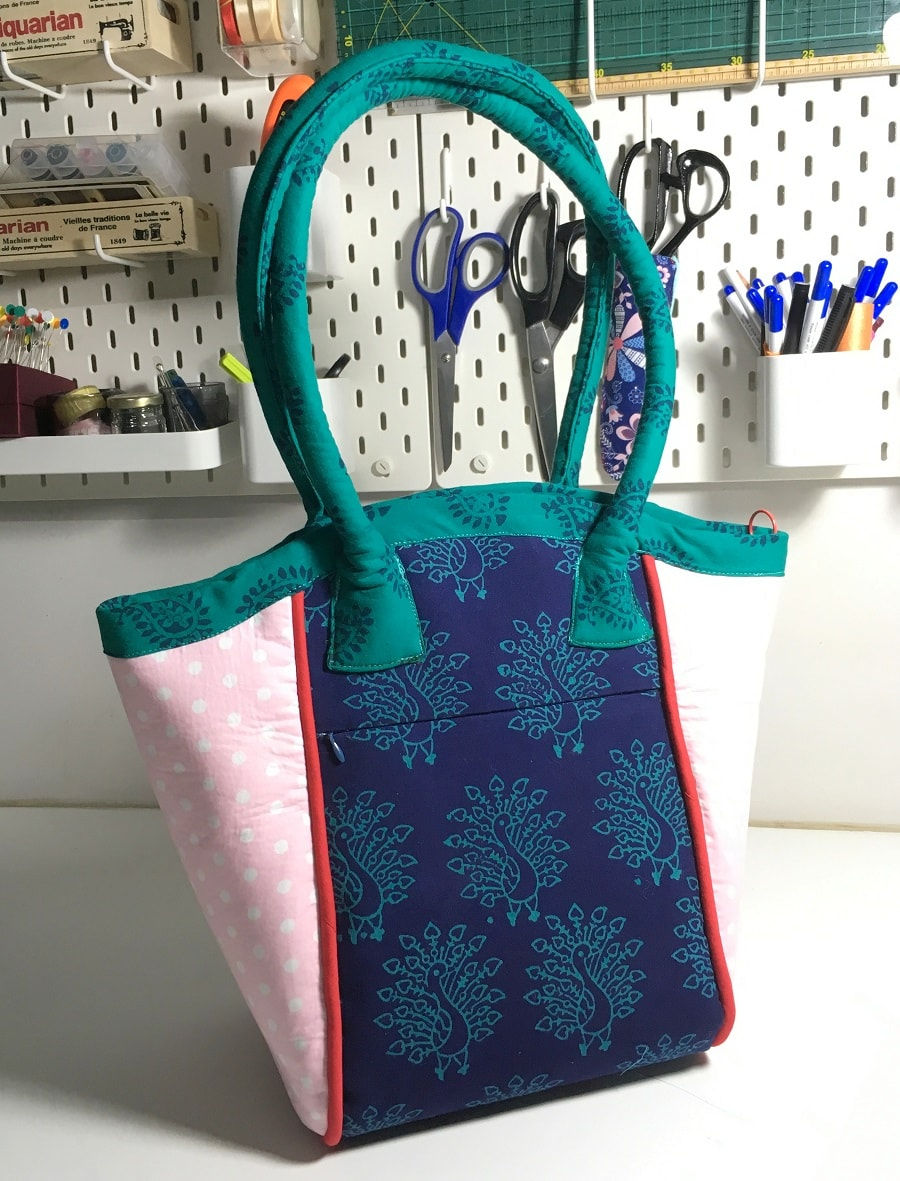
My mother’s handbags have always had exterior zippered pockets. It is one of her top must-haves when she shops for a handbag. So, when I wanted to make her a bag for Mother’s Day, I knew I had to make sure it had exterior zippered pockets for her to have quick access to her mobile phone and tissue packets.
The “DIY Basket Tote” pattern by Sew Can See has a clean exterior. It was that clean look that attracted me to this pattern at the first place. In order not to ruin the clean look of this bag, while still be able to add a zippered pocket to its exterior, I used an invisible zipper. Read on to learn how to modify the a bag pattern and create the invisible zippered pocket.
Note: This can be done with a regular zipper foot (instead of an invisible zipper foot). You can see from the photo the result is still good.
An invisible zipper foot will make it a lot easier (and probably neater too), but it is not a must, especially for this bag pattern, where the fabrics were applied with hard interfacing and fusible felt, which hid flaws.
STEP 1: Modify Original Pattern
First, let us look at the original bag pattern pieces.

To create a pattern that has an invisible zipper opening, modify the original body piece pattern as follows:

To create the pocket lining pattern piece, modify the original body pattern piece as follows:

STEP 2: Cut Fabrics
Cut main exterior fabric according to the modified body piece pattern. Try to match the fabric print along the seam allowance lines as the two pieces of fabric meet at the zipper opening.

And cut pocket lining fabric according to the pocket lining pattern.

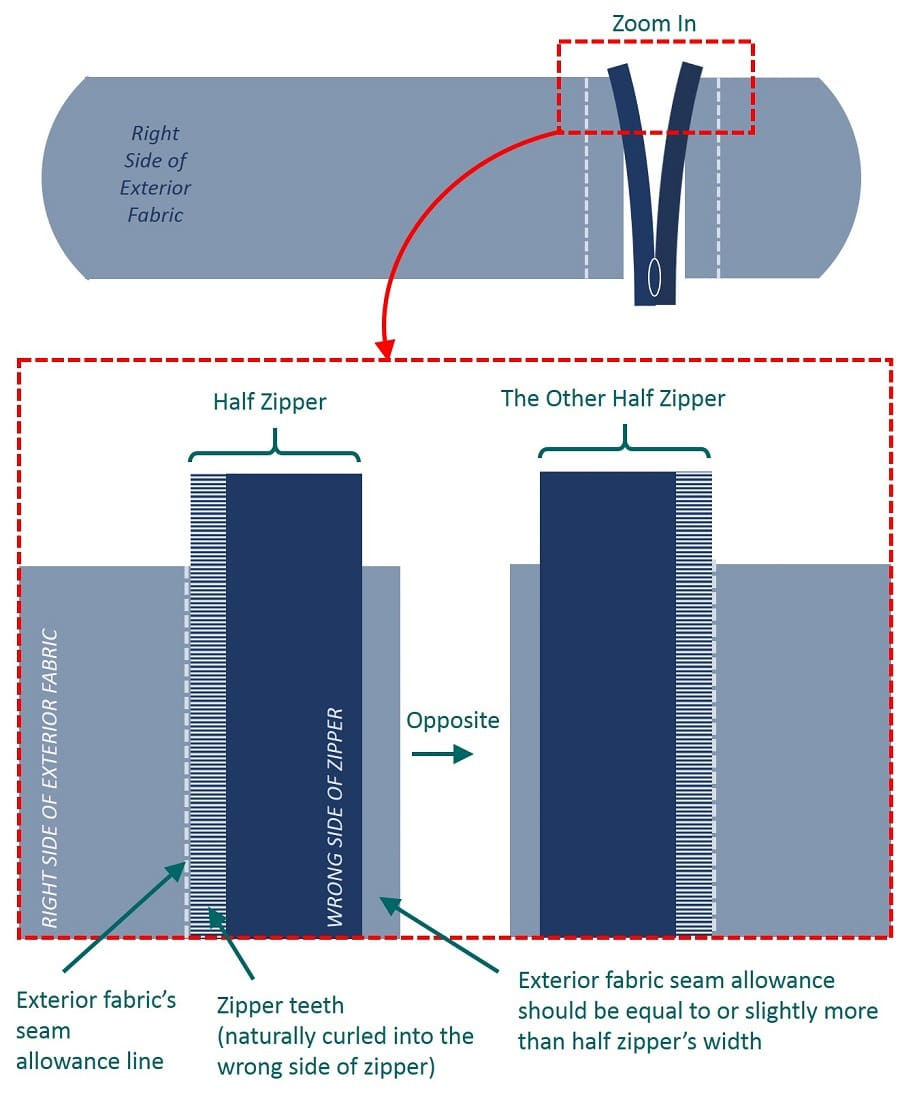
STEP 3: Sew Invisible Zipper to Exterior Fabric
This step is the same as any invisible zipper installation process. Below are some illustrations that maintain continuity of the illustrations in this tutorial. For full details on how to sew invisible zippers, here is a good video tutorial by Angela Wolf.


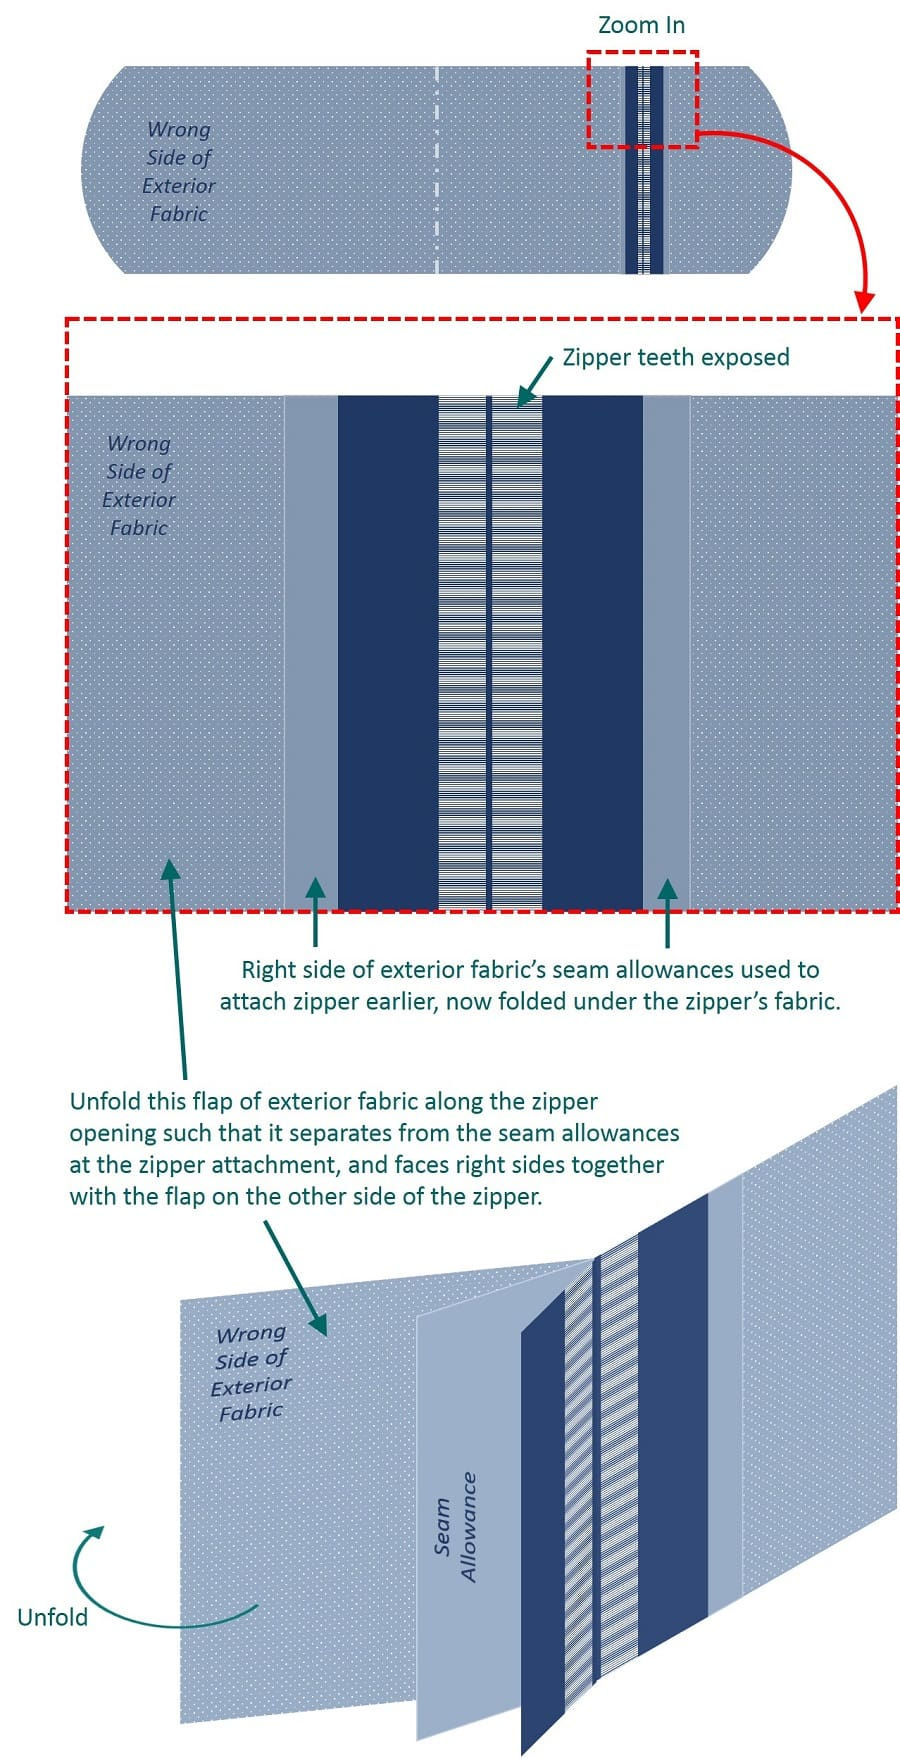
STEP 4: Isolate Seam Allowance of Long Flap
Unfold the long flap of exterior fabric as illustrated below. The aim is to isolate its seam allowance at the zipper attachment so that in the next step, the pocket lining can be sewed onto the seam allowance ONLY. Pin the layers in place.

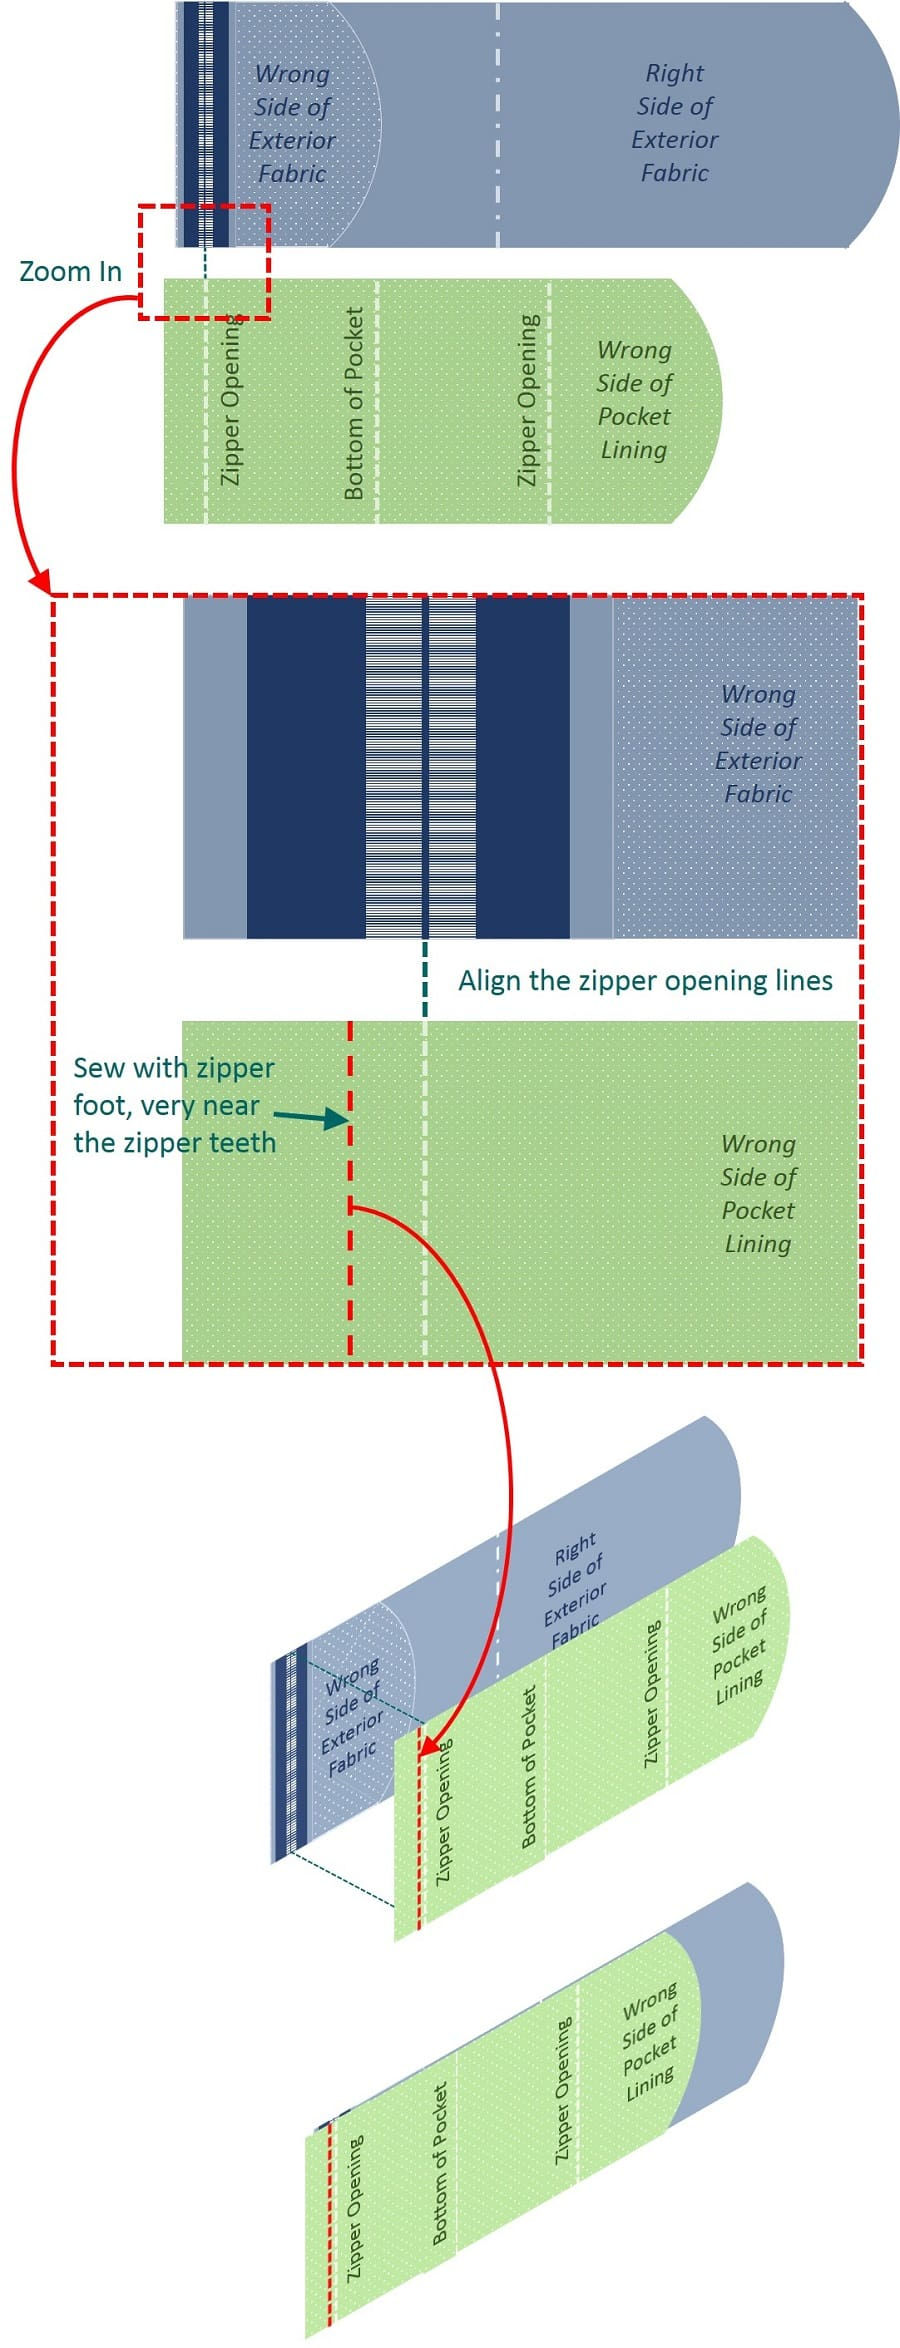
STEP 5: Sew Pocket Lining onto One Side of Zipper Opening
Align and sew the pocket lining fabric to the isolated seam allowance of the long flap, as illustrated below. Use a zipper foot because you need to get close to the zipper teeth.
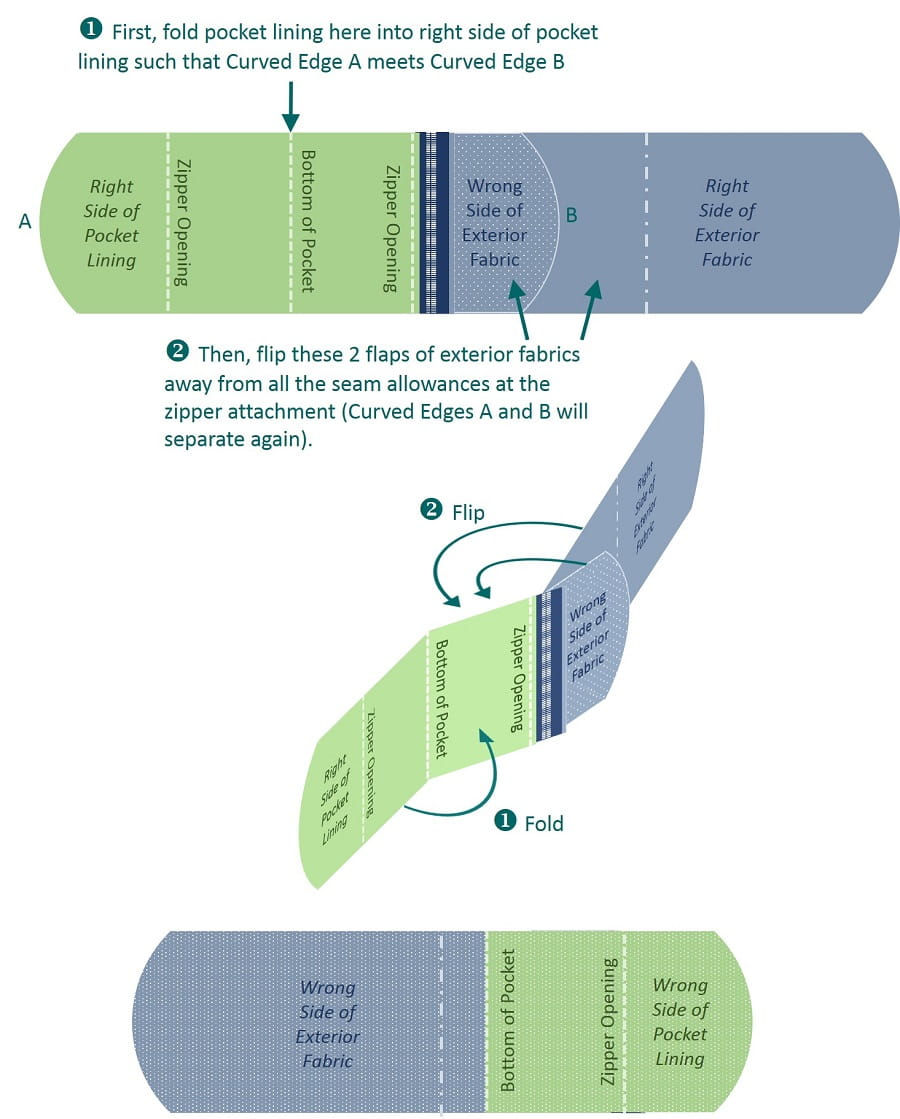
STEP 6: Fold Pocket Lining & Isolate Seam Allowance of Short Flap
First, fold the entire flap of pocket lining to its wrong side, along the stitch line (red dotted line).

Then, flip both the long and short flaps of the exterior fabric away from the short flap’s seam allowance. The aim is to isolate the short flap's seam allowance at the zipper attachment, so that in the next step, the pocket lining can be sewed onto the short flap’s seam allowance ONLY. Pin the layers in place.
STEP 7: Sew Pocket Lining onto the Other Side of Zipper Opening
Sew the pocket lining fabric to the isolated seam allowance of the short flap, as illustrated below. Use a zipper foot because you need to get close to the zipper teeth.

STEP 8: Flip Short Flap Back into Original Position
Flip the short flap of the exterior fabric back into its original position, such that its curved edge meets the curved edge of the pocket lining (do not worry if they do not match up exactly – these will all be concealed under bias binding or the bag’s lining).

COMPLETE!
You have just completed the modified body piece with an invisible zippered pocket!

Here are real life photos of my modified body piece with invisible zippered pocket. In these photos, I have already applied hard interfacing on the wrong side of the exterior fabric. Regardless of what type or how many layers of interfacing you are using, they should be applied directly onto the exterior fabric, without trapping any seam allowance or pocket lining in between.


Proceed with the rest of the original basket tote tutorial using this modified body piece and you will eventually end up with a basket tote with an invisible zippered pocket!
For more details on this basket tote that I made, go to this post.

Comments