Patchwork Curtains
- Sew, Jahit

- Apr 30, 2019
- 6 min read
Updated: Jan 16, 2024
Take your love for patchwork to the next level. Adorn your glass doors and windows with these unique patchwork curtains that you can actually make at home!

What started off as curiosity and a bargain find had escalated quickly into a full-blown love for patchwork.
The floor-to-ceiling glass doors in our living room had long been without proper curtains. We took down the old curtains for washing 3 years ago, but never got to hanging them back up as we grew to like the unobstructed natural lighting spilling into our living room.
Lately though, the living room had felt bare and lacked soft elements, especially after we replaced our old sofas with wooden chairs and faux leather upholstery. Our old curtains were this dull shade of indigo that would do nothing to uplift the space. We needed a new set that was both bright and light.
In the midst of my patchwork fever, I figured I could make my own patchwork curtains! Since the curtains were going to be light i.e. made of thin fabrics, I knew my basic sewing machine would be able to handle the project, as long as I was prepared to manouevre large bundle of fabrics around tight sewing spaces.

Fabric Arrangement and Dimensions
For my patchwork curtains, I knew what colour scheme I wanted and I had already been eyeing a number of fabrics online as well as in local stores. I just had to determine the number of prints and how much yardage I needed.
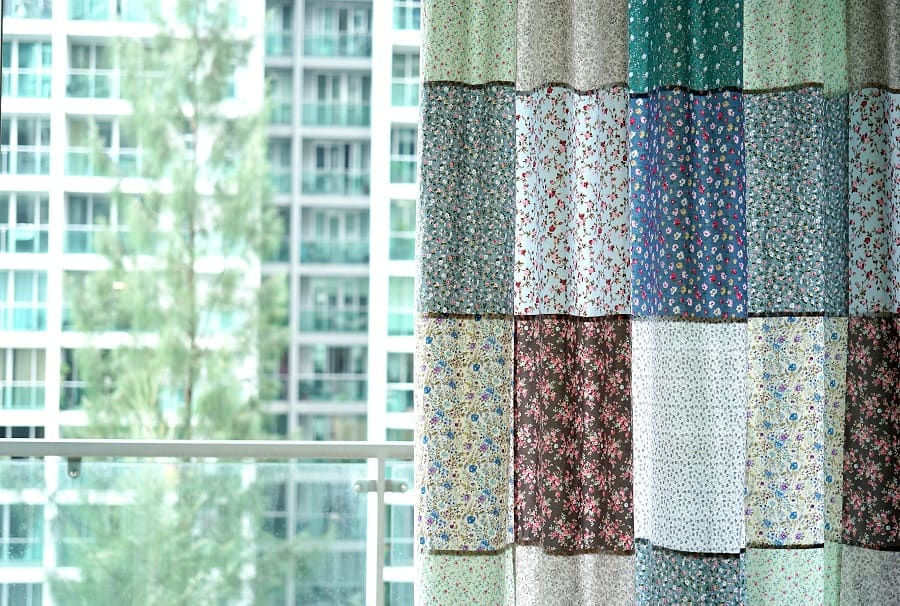
Having never sewed curtains before, and knowing the amount of investment this project would take, I had to make sure my calculations were accurate and that I was adequately equipped - both in terms of tools and skills. Cue plenty of research, measuring and calculations, I had finally decided on a combination of 9 fabric prints, arranged into 2 x 6 blocks of 3 x 3 squares, plus another print for the bottom strip as shown in the image below.


I had planned for each fabric square to be exactly 50 cm x 50 cm (including seam allowance). Unfortunately, some of the fabrics which I bought online arrived in widths that were not as advertised (Note: Do not trust those advertised selvage-to-selvage widths. Order extra!). This really threw off my initial calculations and I had to recalculate the optimum dimensions of the squares that result in the least wastage and sufficient curtain length and width for pleating. Those dimensions turned out to be 48 cm x 47 cm (which technically makes them rectangles, but for simplicity's sake, I'll continue calling them squares in this post).

On Curtain Pleating Tapes and Hooks
Since my glass doors already had pre-existing curtain rail and roller wheels, I had to stick to the same method of hanging my curtains (using curtain pleating tapes and hooks).
Different ways of hanging and pleating require different curtain lengths and widths. Generally, the curtain width (before pleating) should be at least twice the length of the curtain rail (in my case, my curtain rail's length equaled the width of my glass doors). And although I had the bottom strip's dimensions calculated above, I hanged my unfinished curtains and measured the gap from the floor to determine the height of the bottom strip (see STEP 5 below).
Twice the width may seem excessive for someone who had never tried gathering fabrics, but you will be surprised at how much fabric is needed to create just the slightest amount of gather.
The pleating tape and hook system is very versatile. As long as you have at least twice the width of the curtain rail, you will always be able to pleat the curtain (by methodically inserting the prongs of the curtain hooks into the pockets of the tape) until the width of the gathered curtain shrinks to the length of the curtain rail. Here is a website that teaches the different pleating methods.


Note: I ended up with not enough pockets on one end of the curtain tape to completely create the last pleat. I found that it won't be obvious if the last few pleats are slightly different from the rest. So, I pleated in whatever way possible near the end, as long as the last pocket on the curtain tape was used in that last pleat.
The Making Process
Now that I have all my fabrics ready, as well as hanging and pleating methods sorted out, it was time to begin making the curtains!
STEP 1: CUT OUT FABRIC SQUARES
There are obviously many ways to do this. You could measure and draw each square on the fabric, or you could cut out a piece of cardboard in the desired dimensions and then trace its shape onto the fabric. I did the latter.


STEP 2: SEW BLOCKS OF 3 X 3 SQUARES

Starting with any adjacent squares, I used french seams to piece them together (so that no raw edges are exposed at the back of the curtains), while keeping to my planned 2 cm seam allowance. That means I sewed wrong sides together 0.8 cm from the edge, and then right sides together 1.2 cm from the folded edge.


I kept piecing the squares together until all 9 squares were pieced together to form a block of 3 x 3 squares.

Note: Basic patchwork principles apply. I first sewed horizontal strips of 3 squares and then pieced the strips together in horizontal continuous seams. Alternatively, you could first sew vertical strips of 3 squares and then piece them together in vertical continuous seams.
And then I repeated the above steps until I have 6 of the above blocks.

STEP 3: SEW 6 BLOCKS TOGETHER TO FORM ONE CURTAIN PANEL
Using the same french seams method, I then pieced together the 6 blocks from STEP 2 above to form a panel.
Similarly, basic patchwork principles apply. I first sewed horizontal strips of 3 blocks and then I sewed the horizontal strips together in one continuous horizontal seam.

STEP 4: Attach Curtain Pleating Tape
I folded the raw edge at the head of the curtain panel from STEP 3, about 2 cm into the wrong side, and pinned it. Then, I cut a length of curtain tape that equaled the width of the panel, and then pinned it on top of the 2 cm fold, about 2 mm away from the folded edge.
IMPORTANT! Double check that the pockets of the curtain tape were on the surface, and the opening to the pockets are pointing down.

Then, I top stitched the tape onto the head of the curtain panel about 3 mm away from the top edge of the tape. My curtain tape had a red dotted line as a guide for this step.

Then, I removed any pins that were still sandwiched between the curtain tape and the curtain panel, and top stitched along the bottom edge of the curtain tape, to completely attach the curtain tape onto the head of the curtain panel.
STEP 5: TEST HANG CURTAIN
With the unfinished raw edges at the sides and bottom of the curtain panel, I inserted curtain hooks into the pleating tape and test-hang the curtain. I measured the gap between the bottom of the panel and the floor, to determine the height of the bottom strip that was needed to close the gap. This worked out to be about 12 cm (without seam allowance). So that was the measurement I used to cut the bottom strip from the 10th fabric print that I had not started using up to this point.
Then, I sewed (using french seam) the bottom strip along the bottom of the panel to form a complete curtain panel.

STEP 6: HEM ALL RAW EDGES
Now, all that was left was to hem the raw side and bottom edges of the curtain panel. I simply folded the bottom edge into the wrong side about 1 cm twice and then run the hem under the sewing machine with a straight stitch. I then repeated the same for the 2 side hems.
Note: I find it neater to hem the bottom first, then the sides, so that no folds are visible from the normal eye level. Not that it would be obvious, but since the steps were exactly the same, why not do it the neater way?
STEP 7: REPEAT STEPS 1 TO 6 TO MAKE THE OTHER CURTAIN PANEL

STEP 8: INSERT HOOKS AND HANG CURTAINS!

End Product
We have a layer of sheer curtains behind our patchwork curtains, so if we needed to block more sunlight, we could just draw close both the sheer and the patchwork curtains. Otherwise, I am really loving the backlit glow of the patchwork curtains on sunny days.


And I am guessing that a certain toddler likes the new curtains too! ♡


Conclusion
You may notice that the processes above are written in first person, as opposed to the usual instructional tone of a tutorial. This is because I consider this a sharing more than a tutorial. There are likely more professional and effective methods of putting this project together, and I would love to hear from you in the comments section if you know of such methods!
This project turned out the be a lot simpler and quicker than I expected. A lot of it was repetitive work, and I think I spent more time pinning and iron pressing (all those french seams!) than actually sewing. Once I got the hang of the french seams, though, I managed with lesser and lesser pins, and with quicker and quicker stitches.
I hope this post will inspire someone else to try this, so more people could enjoy beautiful homemade curtains!


Comments